5 Top Tips to Avoid Running Injuries
It’s no wonder our knees are highly prone to injury. They house a complex network of muscles, ligaments and joints, and are crucial to our agility and daily movements.
If you are experiencing knee pain, it’s important not to ignore this message from your body. While it’s common to have occasional aches, if the pain limits your ability to perform normal daily activities like climbing stairs or walking with ease, have a medical professional check it out.
At any age, it’s important to protect and strengthen your knees to help prevent pain and injury. Here are five tips from expert PT Andrew Griffin, director of GRIFFIT Outdoor Fitness + Pilates and creator of 28 Day BODY BLITZ.
1: Strengthen Your Gluteal Muscles
Strong glutes will protect you from pain and injury. Having a strong and stable pelvis (hip bone) is fundamental to good spinal health, proper movement patterns, and avoiding back pain and injury. The best way to protect and stabilize your pelvis is by having strong glutes.
When the glutes are weak or inactive, the joints around the hips, namely the lower back and the knee can take on a lot more stress. Left unchecked over time, this can lead to pain, or even worse, injury in those areas. If you suffer from lower back or knee pain, it’s crucial to incorporate posterior chain (muscles at the back of the leg) strengthening exercises into your training regime.
Unfortunately, flat surface running doesn’t create enough resistance to simulate muscle growth in the glutes. Therefore, in order to strengthen the posterior chain of muscles, you need to proactively train your glutes with exercises like deadlifts, squats and lunges. Completed with the correct form, these exercises will provide the muscle development in your glutes to prevent injury.
Correct form of deadlift, squats, and lunge
2: Incorporate Regular Stretching Program
Muscles work best when they are both long and strong. While strength and running training improve power and size of a muscle, they also decrease range of movement. I liken it to owning a sports car but only being able to use a small percentage of the power due to driving in a constant 40km zone! To unlock the muscles full potential, 12-15 minutes must be spent (post running, aftercool down) stretching.
Static Stretch Basics
Stretch the muscle to the point of its greatest range of motion, but do not overextend. You should feel very minimal tightness/discomfort (but not pain).
Hold and control the stretch for at least 30 seconds (and maximum 60 seconds).
Stretch all the major leg muscle groups (e.g., calves, hamstrings, quadriceps, groin, hip flexors).
Stretch uniformly (after stretching one leg, stretch the other).
Don’t overstretch an injured area as this may cause additional damage.
CAUTION: Never bounce when stretching (ballistic stretching). This increases your chances of incurring injury through excessive range of movement.
Calf Stretch
To stretch your calf muscle (gastrocnemius) and Achilles tendon, stand at arm’s length from a wall or heavy piece of equipment. Place your right foot behind your left foot, keeping the knee on your right leg straight, but not locked. Keep your right heel on the floor as you bend your left leg. Maintain for 30-60 seconds repeating both legs.
Hamstring Stretch
Your hamstring muscles run along the back of your upper leg, from knee to hip. This stretch isolates the hamstring muscle without placing stress on your back and neck. Maintain for 30-60 seconds repeating both legs.
Quadriceps stretch
This stretches your quadriceps muscle, the muscle on the front of your thigh. Standing near a wall or a piece of equipment for support, grasp your ankle and gently pull your heel up and back until you feel a stretch in the front of your thigh. Hold for 30-60 seconds repeating both legs.
Hip Flexor Stretch
Your hip flexor starts the movement of your leg whenever you walk or run. It’s located on your front, upper thigh, just below your hipbone.
Kneel on your right knee. Place your left foot in front of you, bending your knee and placing your left hand on that leg for stability. Hold for 30-60 seconds repeating both legs.
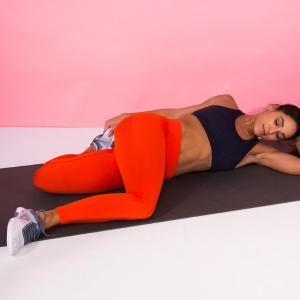
Iliotibial Band (ITB) Stretch
The iliotibial band (ITB) is a band of tissue that runs along the outside of your hip and thigh. Runners in particular can have a tight ITB, which can cause pain in the outside aspect of the knee or hip. Lying flat, internally rotate your right hip and place left leg on top. Stretch for 30-60 seconds repeating both legs.
Lower Back Flexion Stretch
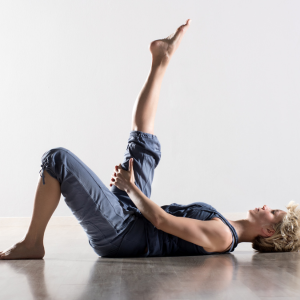
The knee-to-chest stretch (lower back flexion stretch) works the muscles of your lower back.
Lie on your back on a firm surface with your knees and hips bent and backs of your heels flat on the floor. Gently pull one knee up to your chest until you feel a stretch in your lower back. Hold stretch for 30-60 seconds repeating for both legs.
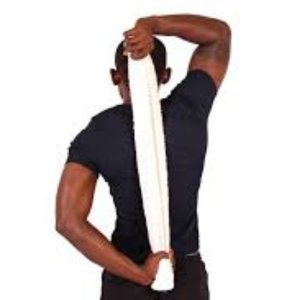
Shoulder Stretch with Towel
This stretches your shoulder’s internal rotators, the muscles often used in overhead sports. Increasing flexibility of the internal rotators can help protect against rotator cuff injuries.
Use a towel to assist with this stretch. Grasp the towel firmly with both hands, as shown. Gently pull the towel toward the ceiling with your top hand. You’ll feel a stretch in the shoulder of your opposite arm as your lower hand is gently pulled farther up your back. Hold for 30-60 seconds repeating both sides.
3: Developing a Mid-Foot Strike
Runners fall into 3 categories when it comes to foot strike: heel, mid foot and toe. Each of these have a pre-determined effect on the body. The optimal landing position we will be discussing is midfoot.
Midfoot strike patterns significantly reduce stress on the knee due to the larger gluteal muscles being activated on impact. This foot placement should be considered for all runners suffering with recurring knee pain, especially fast runners with wide feet and flexible Achilles Tendons.
Toes strikers engage the Calf and Soleus muscles upon impact. This can be beneficial for sprinters, but volume runners will be vulnerable to overload injuries due to the Calf muscle being much smaller than the powerful Gluteal muscles.
When you heel strike, the weight of your body compounds with the impact from gravity and the ground, concentrating an enormous amount of force in your lower legs. Over time, this puts you at a higher risk for injury. This is especially important to note for runners that have had a previous lower limb injury or carrying excess weight.
Heel striking is most common when a runner’s gait is too long, forcing the foot to land in front of the knee. An easy fix is shortening the running stride, increasing knee drive and naturally moving back into a midfoot strike.
If you are unsure of your foot strike (which is common), inspect at an old pair of running shoes and note the wear pattern. This will tell you everything that you need know regarding your foots impact position with the ground.
Trying to adapt a midfoot strike is something that should be done gradually as to not alter your running form too quickly, which also puts you at risk of injury through poor biomechanics. The best way to make a smooth transition is to start by focusing on midfoot striking for portions of your run. If you go on a 4km run, focus on staying on your midfoot for the first and final kilometer. Within 4 weeks you will find that your body has picked up on the new habit and you will be reducing the volume of the toe/heel striking. P
If you are a heel striker, which is most common, there are increasing options of running shoes with the heels shaved out of them to force you into a favorable mid foot landing position. Speak to your local running shop regarding the best option for you.
Finally, introduce some barefoot running on the grass or at the beach. Without shoes on, you will have a better feel for how to propriocept your foot upon landing so that you can practice an accurate mid foot landing. You will also be able to inspect your foot imprint at the end of your run as a training aid.
4: Gait Analysis Before Purchasing Running Shoes
Selecting a running shoe can be overwhelming if you don't know what you are looking for. They have all been designed with different foot functions in mind and the technology reflects this. Each of these shoes are built for different foot types. As an exercise professional I frequently get asked; "what is the best running shoe?". The answer is, the shoe that provides support `to your individual foot structure.
This is where gait analysis come in.
Gait analysis is a method for identifying biomechanical abnormalities in the gait cycle, or in other words, it’s a tool used to assess the way in which you walk and run. It can be beneficial in that it can identify any overactive or underactive muscles in the feet, which could lead to potential injuries and inefficiencies in the future.
Leading running shoe outlets are now using this technology prior to suggesting running shoes to you the runner. I would suggest only purchasing shoes from outlets offering the service.
3 Primary Foot Functions
1 – Over pronation:
· 70% of the population over pronate, making it the most common foot function amongst runners. Over pronation occurs when there is increased rolling to the inside of your foot during your foot strike cycle. This normally happens when you have a low arch or flat foot.
· Potential injuries: plantar fasciitis, shin splints and ankle strain.
· The shoe type we suggest: Stability
2- Under pronation:
· Foot rolling too much to the outside. This typically happens when the outer side of the foot strikes the ground at a steeper than normal angle causing a large jarring effect to the lower leg.
· Potential injuries: plantar fasciitis, shin splints, heel spurs and knee pain.
· The shoe type we suggest: Neutral
3 – Neutral:
· Usually found in runners with normal sized arches. Neutral pronation occurs when the foot lands on the outside edge and rolls to the inside in a controlled manner. On the push off there is an even distribution of pressure throughout the foot.
· Potential injuries: Reduced chance of injury
· The shoe type we suggest: Neutral
5: Stress, Rest, REPEAT
The “no pain, no gain” mantra of sport and performance is holding less credence than it used to. This is good news, because the more we learn about the body’s ability to adapt to external stimuli, the more intelligently we can train and recover.
Check out my top 3 reasons for programming rest into your periodisation plan.
1 - This is where you achieve your gains
Although it may seem counterintuitive, gains in fitness occur when you rest, not while you’re training. Your body needs to recover in order to absorb the work that you have done and to allow the physiological adaptations to a training stimulus to take place.
2 – Decreasing the risk of injury
Training causes micro-damage to your body’s tissues and without adequate rest and recovery between training sessions the body begins to break down. By scheduling regular rest or low intensity load days into your schedule you reduce the risk of suffering from overuse injuries such as tendonitis and stress fractures.
3 – Time to recharge the batteries
Incorporating a regular rest day or a very easy day into your training will enable you to mentally recharge your batteries as well as physically. It’s important to ‘switch off’ from training and engage in fun cross training options in order to avoid psychological and mental burn out.
My training philosophy is stress, rest, REPEAT
Join GRIFFIT’s Run Club
Ready to put these tips into action? Join our GRIFFIT Run Club to experience expert guidance on injury prevention and running techniques. Our classes offer a supportive community, personalized coaching, and a structured approach to help you stay injury-free and achieve your running goals. With our focus on proper form and training principles, you’ll have the support you need to run safely and effectively. Sign up today and start running smarter, not harder!


